21.10.2024

Prompt Chaining with Workflows + Flutter

Prompt Chaining with Workflows + Flutter

Overview

Prompt chaining is a powerful technique to direct your Ai to create high quality outputs, and can be done with Workflows, Easybeam's no-code Ai agent builder.

Workflows can be integrated into your flutter app (plus other platforms) with a single line of code, when powered by one of the Easybeam SDKs.

Background

It can be hard to get high quality outputs with generative Ai. We've gotten around this with lots of meta-prompting tricks, like including "think step by step", or by telling the Ai that if it doesn't perform well you're going to cut off your hands (no really).

While keeping your prompts highly specific is typically beneficial, details can get lost and quality can suffer when one prompt is trying to do too many things, or has hard requirements that need to be fulfilled.

While we typically think of interactions with the Ai as centering around a single prompt (aka single shot prompting), we can also have multiple prompts sequentially get processed before returning data to the user, this is typically know as prompt chaining.

One use case is in more sensitive user interactions, like in topics such as medicine, finance, or mental health.

Let's take a look at how we might use a prompt chain with a mental health app, specifically one that generates advice for a user.

Workflow & Beams

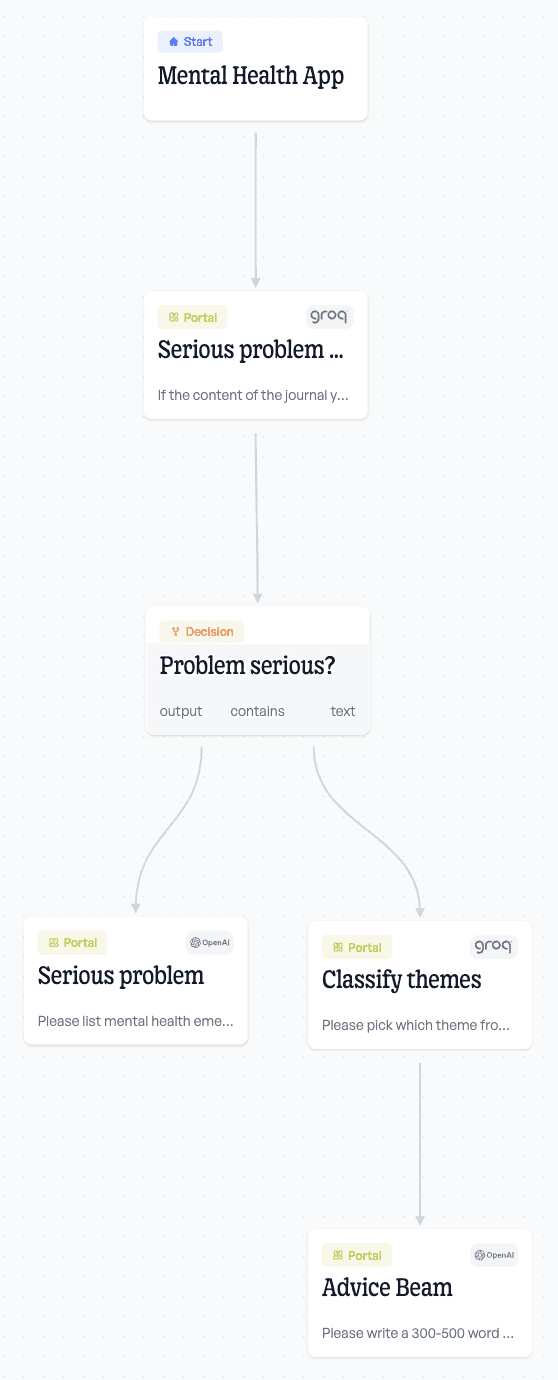
I want to create a prompt chain for this mental health app. I'm most concerned with producing content that gracefully handles extreme cases, and doesn't go off the rails too much. To do so we'll,

  • 1: Assess the journal entry for risk of harm

  • 2: Process result of harm assessment

  • 3a: If TRUE respond with the harm prevention hotline number local to a user's country

  • 3b: If FALSE identify the major theme of the journal

  • 4: Use the identified theme & user data to generate advice

Let's take a look at the whole workflow in Easybeam,
Workflow Config

Here's an example of how I set up the workflow. The detail information for each step is available when you click on it in the builder window:
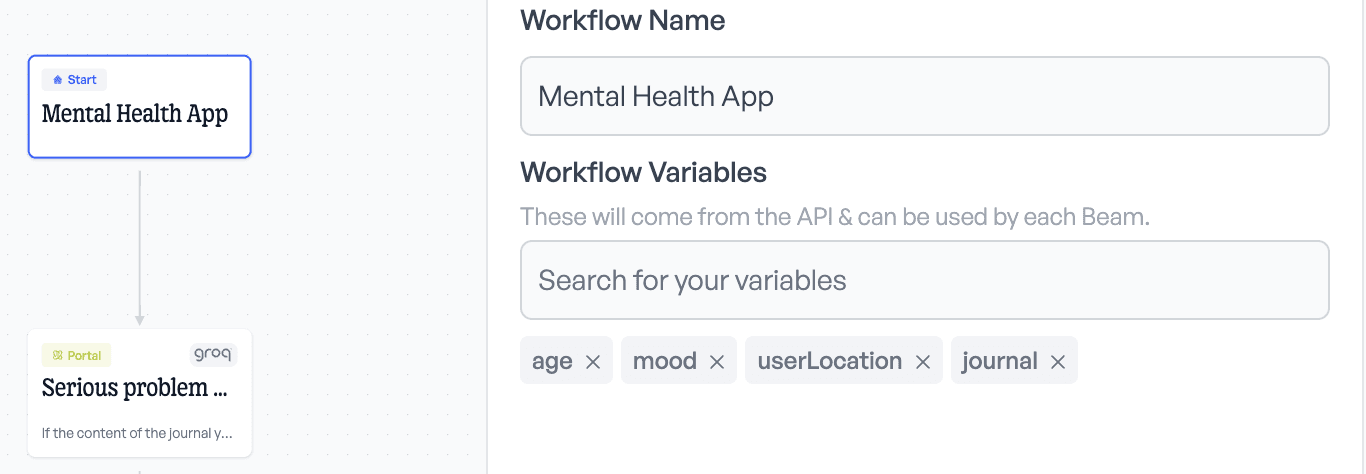
I have 4 variables selected, which means that this workflow expects 4 pieces of data from the user. This is what the filledVariables reflect in the call in the flutter code;

      easybeam.streamWorkflow(
        workflowId: workflowId,
        userId: 'example-user-id',
        filledVariables: {
          "age": widget.age,
          "userlocation": "germany",
          "journal": widget.journalEntry,
          "mood": widget.mood
        }, ...

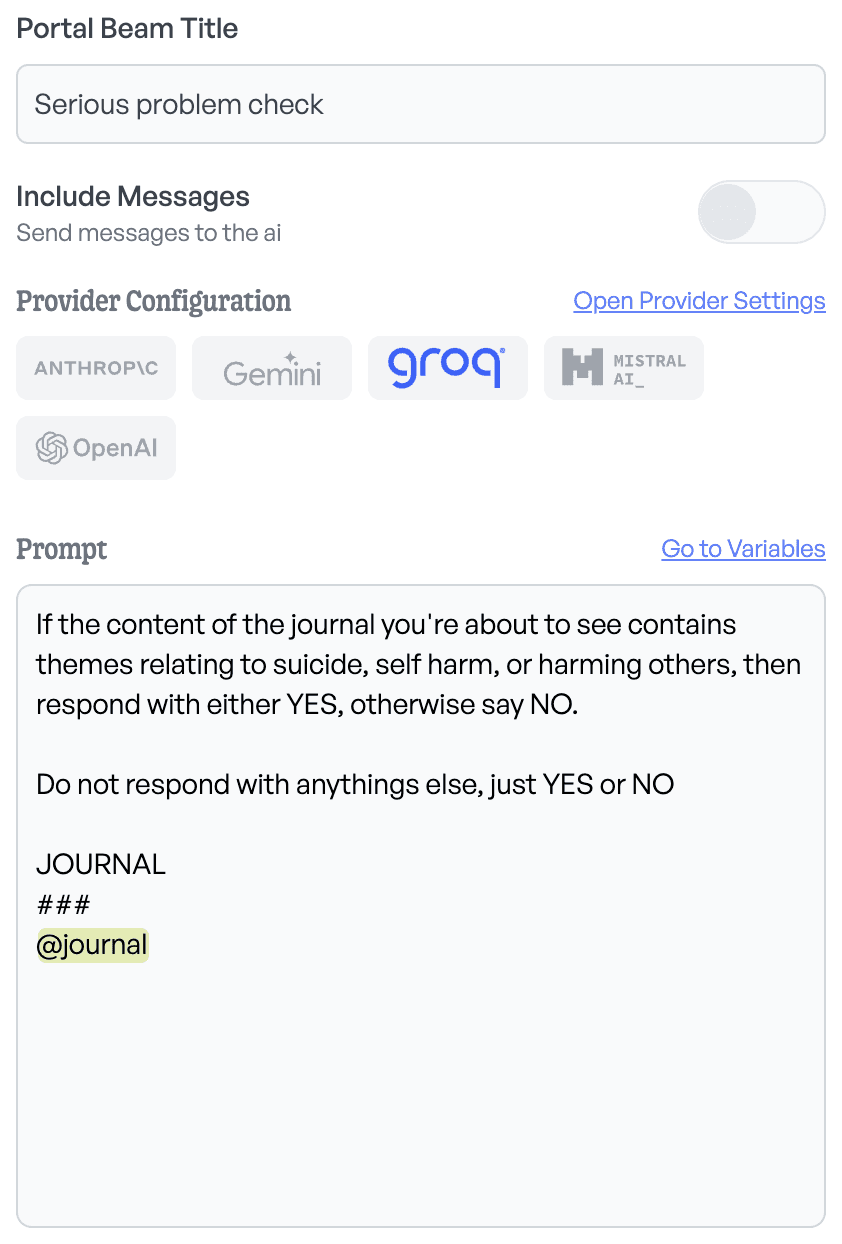
First Beam

I'm using Groq in this example because it has the fastest inference rate of any model.

What's important to note here, is that you have to map the variables that the workflow receives to the variables that actually go into the portal step. So since I'm using @journal here and in the workflow, I have to set it in the inputs section of this portal.
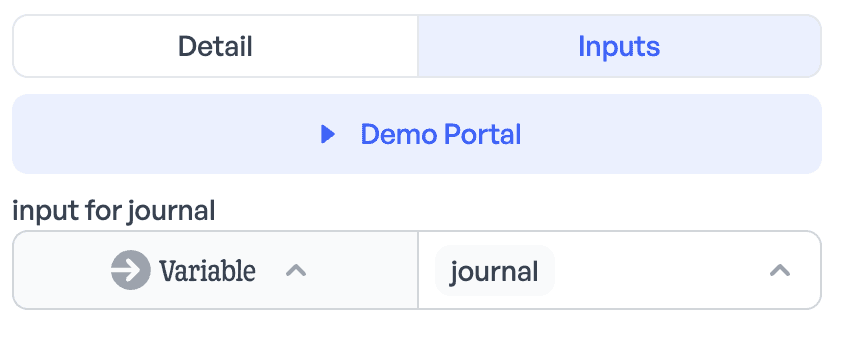
This is important because in a workflow, variables can be filled by values the user sends in a request (workflow variables), static text, or the output of another step (which we'll look at in a sec).

Decision Beam
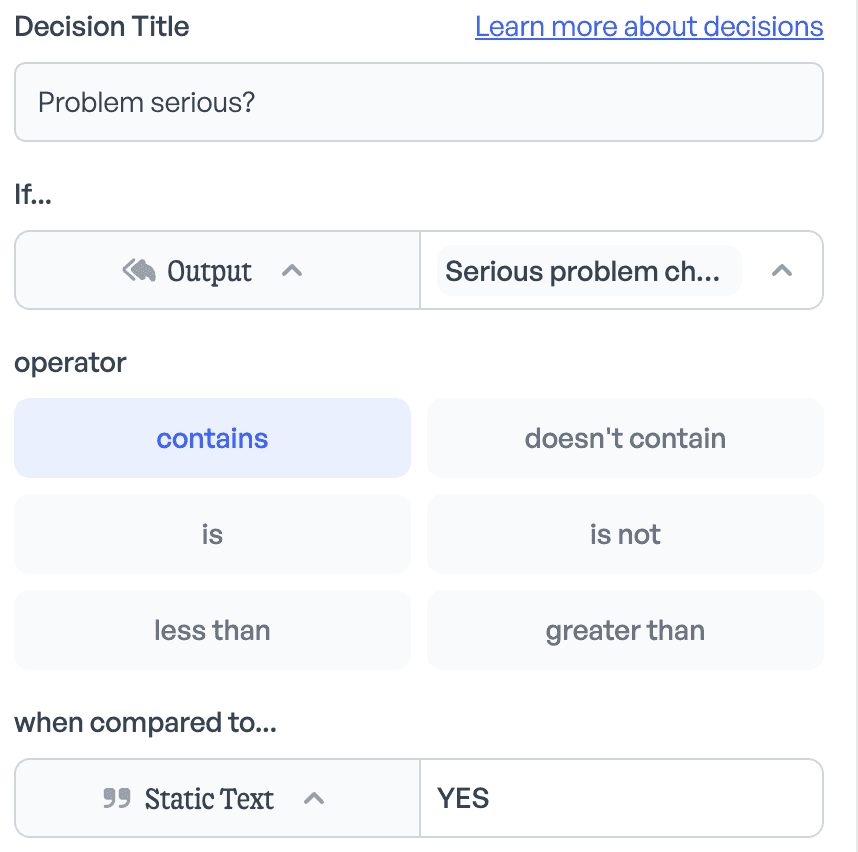
Here we're just checking if the output of the previous step contains YES, and if so we then route to the Serious Problem (which we'll skip for now) beam, and if not we route to the theme classification step.

Classify Theme
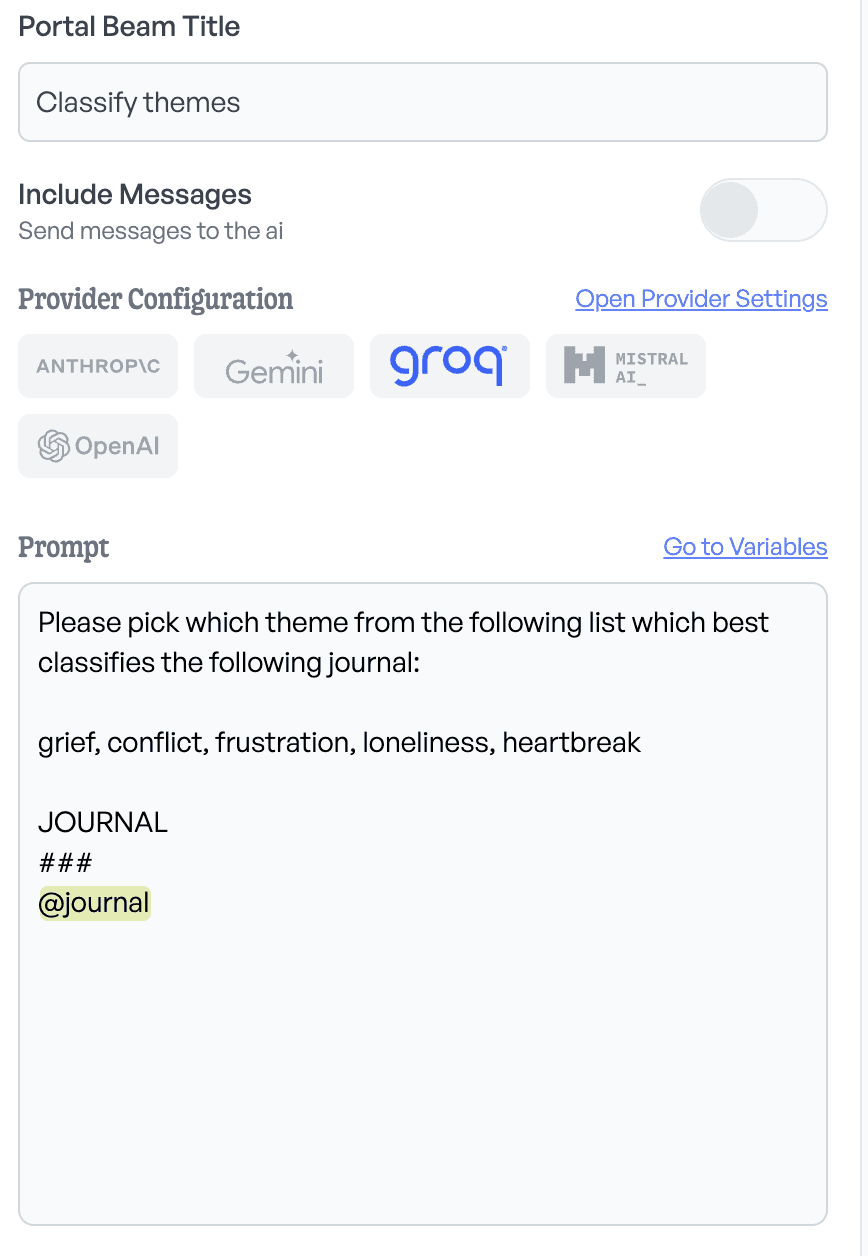
Here we're detecting and limiting the major themes of the advice that will be written. This will be consumed in the next step. The inputs for this step are mapped the same as in the first step.

Advice Beam
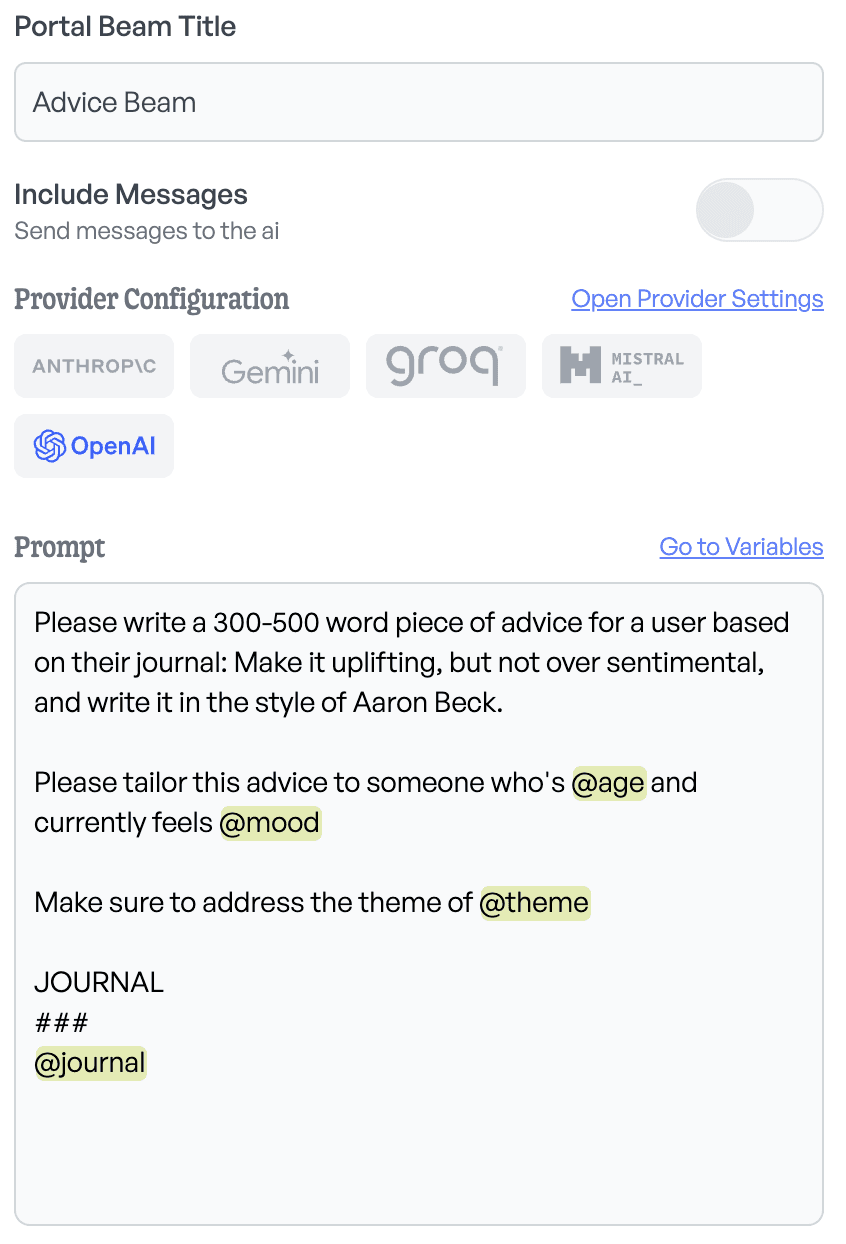
This simple prompt handles the actual generation of advice to the user. You can see that it has 4 variables, only 3 of which came from the user in our flutter code. This is because we actually want to consume the output of the previous theme identification in order to guide the generation of advice, and improve the quality of our output.
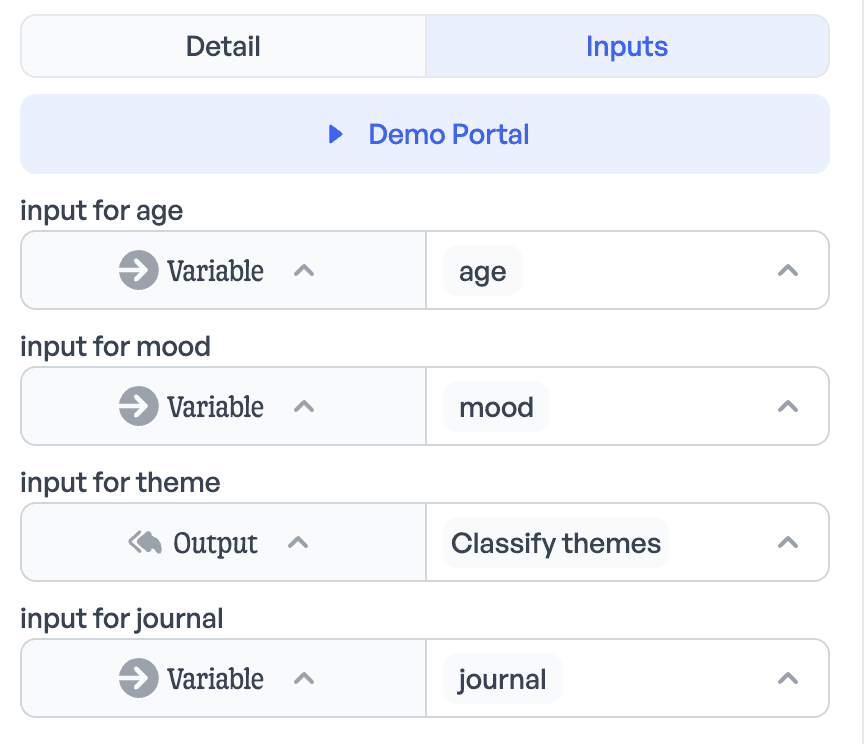
You can see that we've selected Classify themes as the input for the theme. This takes the Ai's output from the previous step, and feeds it into where the variable @themewas in the prompt.

Demoing

To explore the quality of our app, we can demo output before we publish it and make it available to the API.
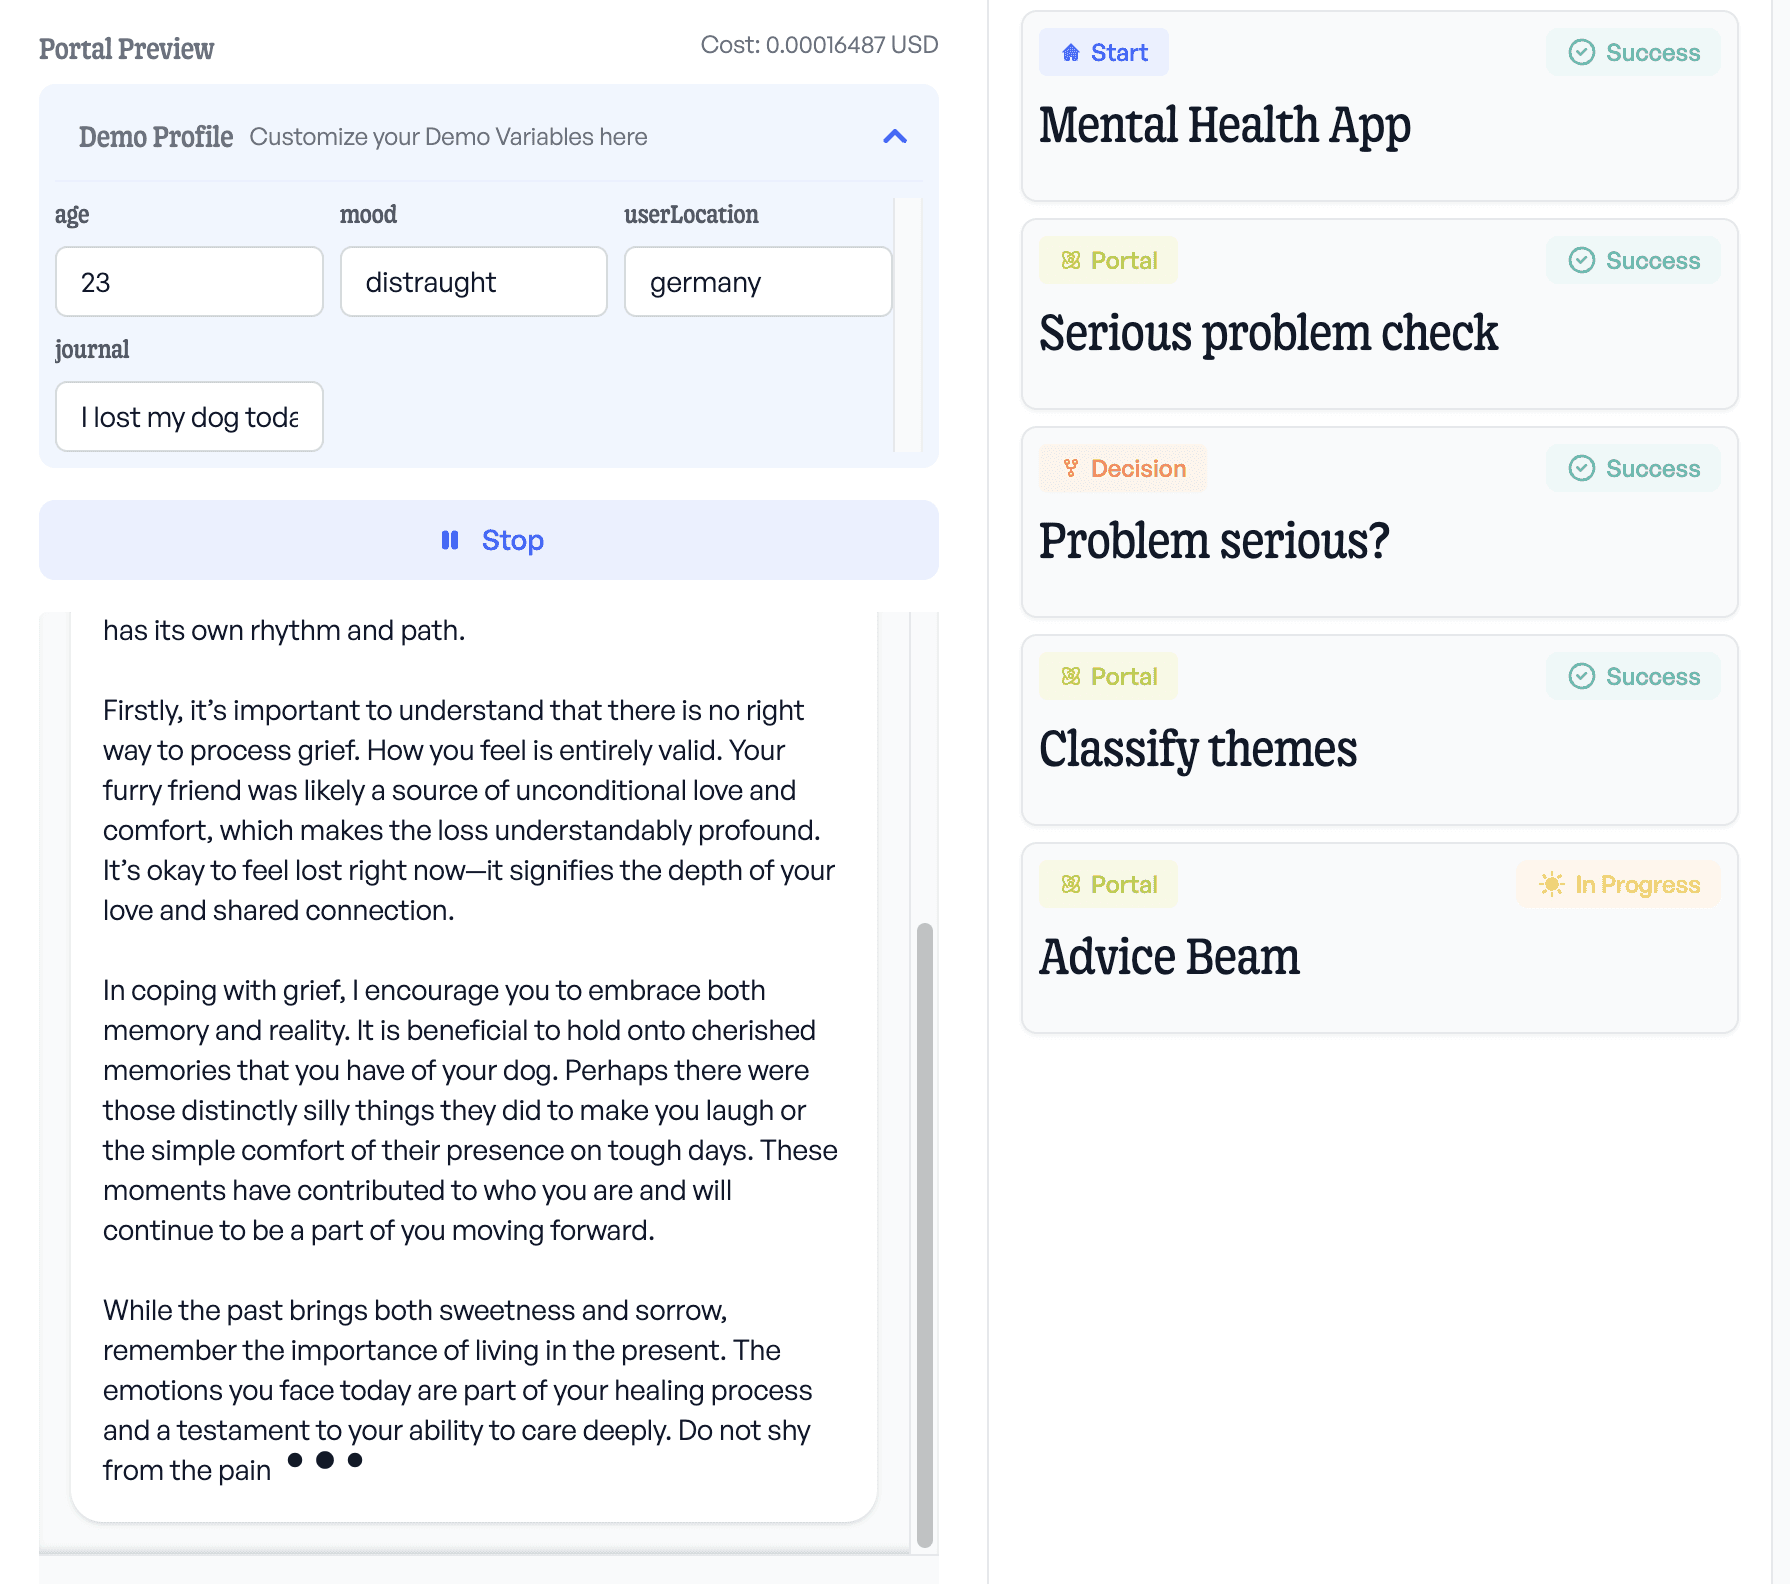

Great! So far so good, now let's double check our negative case,
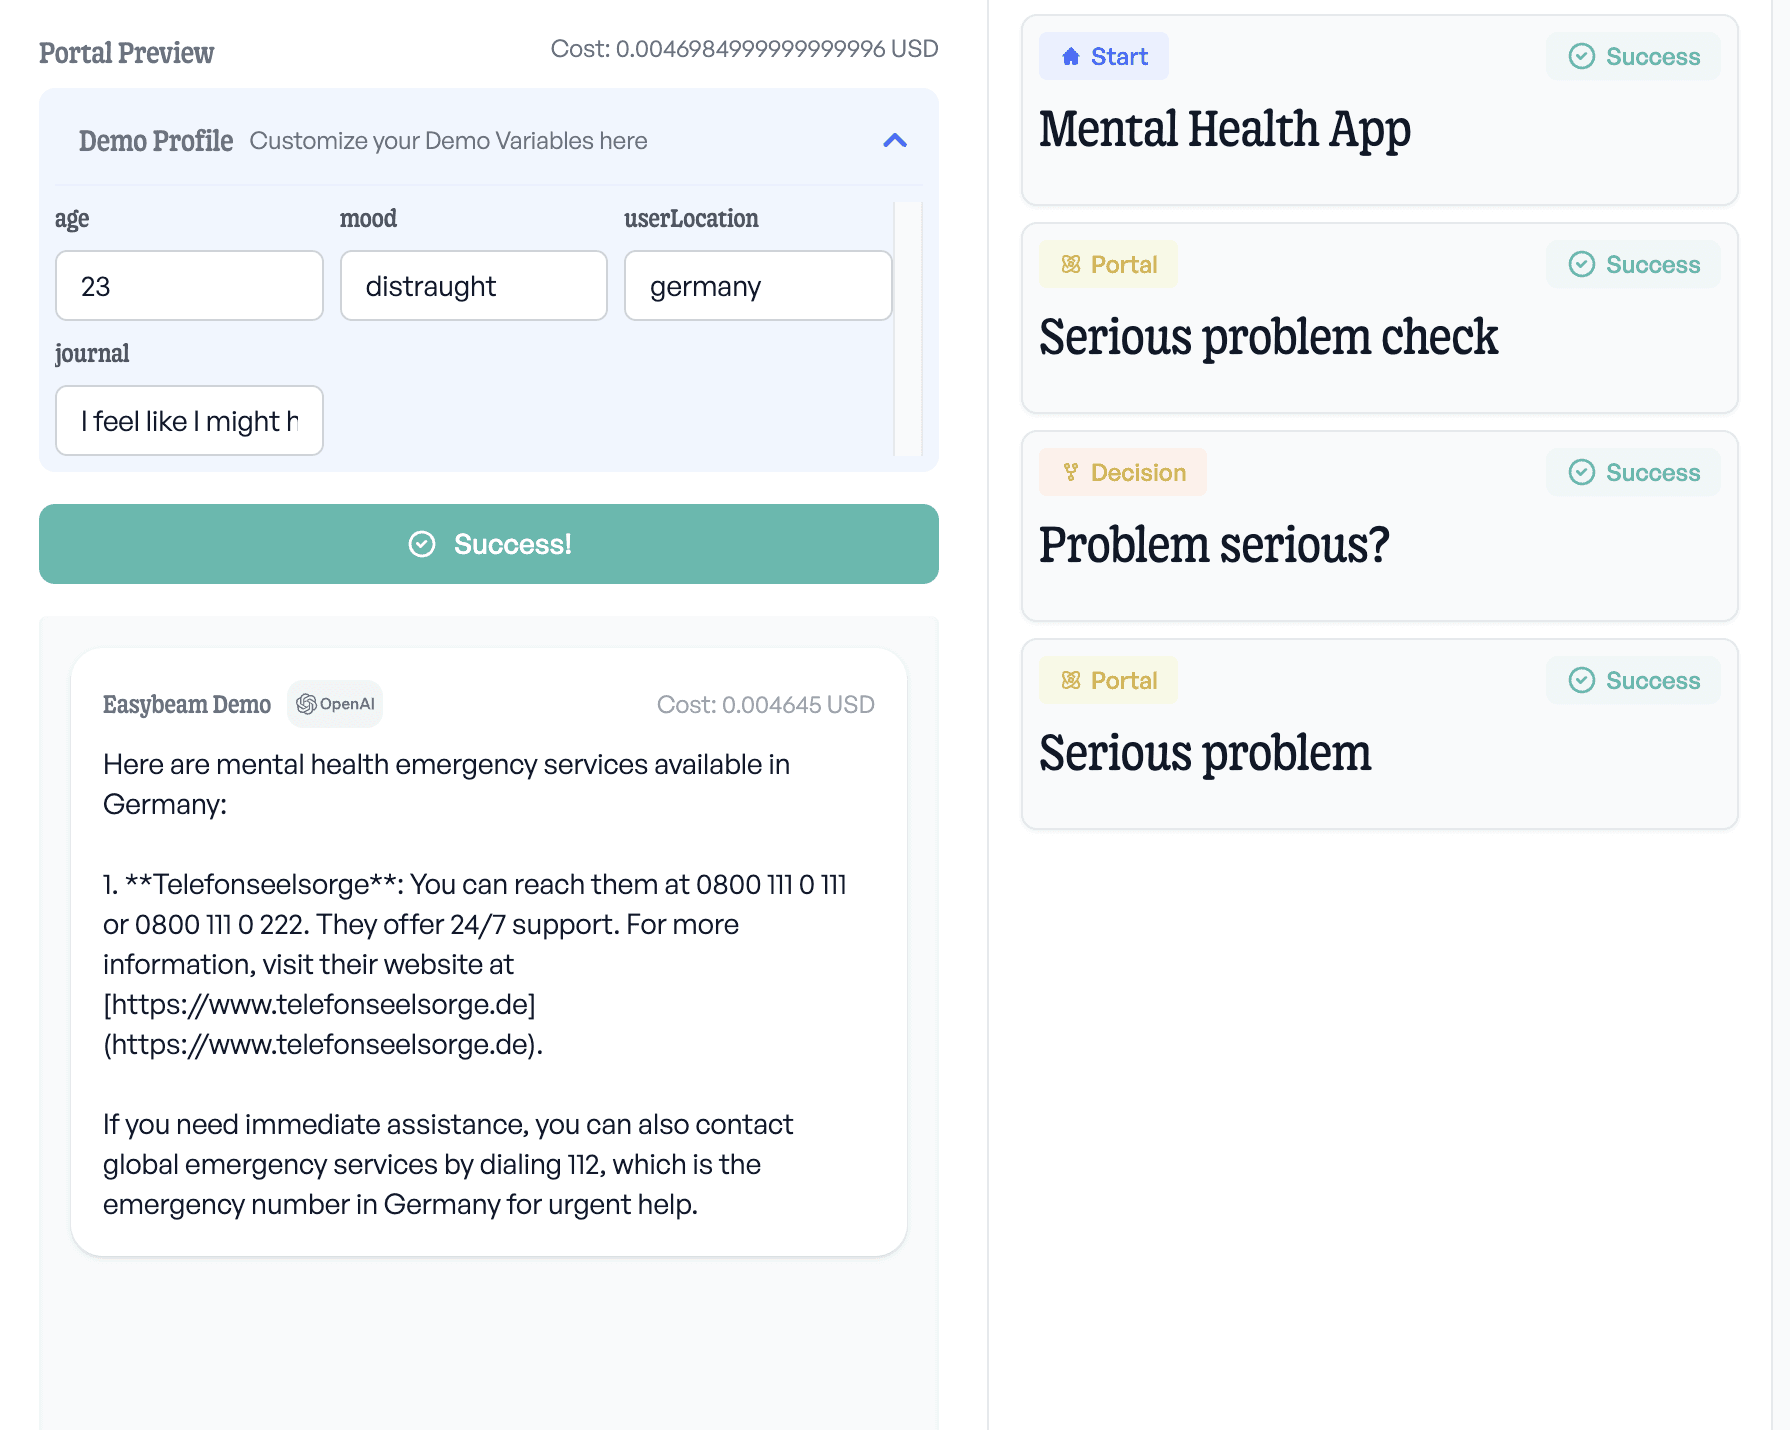
Gracefully handled.

Now let's publish,

App & Integration

We'll just have two screens, and not worry about UI for this demo.

  1. The journal page, where they can enter their journal and some data about how they're feeling, and their age

  2. The advice page, where the advice is streamed in to them.

First we'll add Easybeam with the following command in the root of our project,

flutter pub add easybeam_flutter

Great, now it's only a line of code to get streaming from our workflow!

Here's the main,

Future<void> main() async {
  await dotenv.load(fileName: ".env");
  runApp(const MyApp());
}

class MyApp extends StatelessWidget {
  const MyApp({Key? key}) : super(key: key);

  @override
  Widget build(BuildContext context) {
    return MaterialApp(
      title: 'Mental Health App',
      theme: ThemeData(
        primarySwatch: Colors.green,
      ),
      home: const JournalPage(),
    );
  }
}


Here's the JournalPage,

class JournalPage extends StatefulWidget {
  const JournalPage({Key? key}) : super(key: key);

  @override
  _JournalPageState createState() => _JournalPageState();
}

class _JournalPageState extends State<JournalPage> {
  final TextEditingController _journalController = TextEditingController();
  final TextEditingController _ageController = TextEditingController();
  String _selectedMood = 'Neutral';
  final List<String> _moodOptions = [
    'Happy',
    'Excited',
    'Neutral',
    'Sad',
    'Angry',
    'Anxious'
  ];

  @override
  Widget build(BuildContext context) {
    return Scaffold(
      appBar: AppBar(
        title: const Text('Journal'),
      ),
      body: Padding(
        padding: const EdgeInsets.all(16.0),
        child: Column(
          crossAxisAlignment: CrossAxisAlignment.start,
          children: [
            TextField(
              controller: _ageController,
              keyboardType: TextInputType.number,
              decoration: const InputDecoration(
                labelText: 'Age',
                border: OutlineInputBorder(),
              ),
            ),
            const SizedBox(height: 16),
            DropdownButtonFormField<String>(
              value: _selectedMood,
              onChanged: (String? newValue) {
                setState(() {
                  _selectedMood = newValue!;
                });
              },
              items: _moodOptions.map<DropdownMenuItem<String>>((String value) {
                return DropdownMenuItem<String>(
                  value: value,
                  child: Text(value),
                );
              }).toList(),
              decoration: const InputDecoration(
                labelText: 'Current Mood',
                border: OutlineInputBorder(),
              ),
            ),
            const SizedBox(height: 16),
            Expanded(
              child: TextField(
                controller: _journalController,
                maxLines: null,
                expands: true,
                decoration: const InputDecoration(
                  hintText: 'Write your thoughts here...',
                  border: OutlineInputBorder(),
                ),
              ),
            ),
            const SizedBox(height: 16),
            Center(
              child: ElevatedButton(
                onPressed: () {
                  Navigator.push(
                    context,
                    MaterialPageRoute(
                      builder: (context) => AdvicePage(
                        journalEntry: _journalController.text,
                        age: _ageController.text,
                        mood: _selectedMood,
                      ),
                    ),
                  );
                },
                child: const Text('Get Advice'),
              ),
            ),
          ],
        ),
      ),
    );
  }
}


Here's the AdvicePage,

class AdvicePage extends StatefulWidget {
  final String journalEntry;
  final String age;
  final String mood;

  const AdvicePage({
    Key? key,
    required this.journalEntry,
    required this.age,
    required this.mood,
  }) : super(key: key);

  @override
  _AdvicePageState createState() => _AdvicePageState();
}

class _AdvicePageState extends State<AdvicePage> {
  late final Easybeam easybeam;
  String _streamingResponse = '';
  bool _isStreaming = false;

  @override
  void initState() {
    super.initState();
    final apiToken = dotenv.env['EASYBEAM_API_TOKEN']!;
    easybeam = Easybeam(EasyBeamConfig(token: apiToken));
    _streamAdvice();
  }

  void _streamAdvice() async {
    setState(() {
      _isStreaming = true;
      _streamingResponse = '';
    });

    try {
      final workflowId = dotenv.env['EASYBEAM_WORKFLOW_ID']!;
      easybeam.streamWorkflow(
        workflowId: workflowId,
        userId: 'example-user-id',
        filledVariables: {
          "age": widget.age,
          "userlocation": "germany",
          "journal": widget.journalEntry,
          "mood": widget.mood
        },
        messages: [], // since this isn't a chat we can leave this empty
        onNewResponse: (PortalResponse response) {
          setState(() {
            _streamingResponse = response.newMessage.content;
          });
        },
        onClose: () {
          setState(() {
            _isStreaming = false;
          });
        },
        onError: (error) {
          setState(() {
            _streamingResponse = 'Error: $error';
            _isStreaming = false;
          });
        },
      );
    } catch (e) {
      setState(() {
        _streamingResponse = 'Error: $e';
        _isStreaming = false;
      });
    }
  }

  @override
  Widget build(BuildContext context) {
    return Scaffold(
      appBar: AppBar(
        title: const Text('Advice'),
        actions: [
          IconButton(
            icon: const Icon(Icons.refresh),
            onPressed: _streamAdvice,
            tooltip: 'Reset',
          ),
        ],
      ),
      body: Padding(
        padding: const EdgeInsets.all(16.0),
        child: Column(
          crossAxisAlignment: CrossAxisAlignment.start,
          children: [
            Text(
              'Advice:',
              style: Theme.of(context).textTheme.headlineSmall,
            ),
            const SizedBox(height: 8),
            Expanded(
              child: SingleChildScrollView(
                child: Text(_streamingResponse),
              ),
            ),
            if (_isStreaming)
              const Padding(
                padding: EdgeInsets.symmetric(vertical: 8.0),
                child: LinearProgressIndicator(),
              ),
          ],
        ),
      ),
    );
  }
}

Now let's run the app and see what we get,
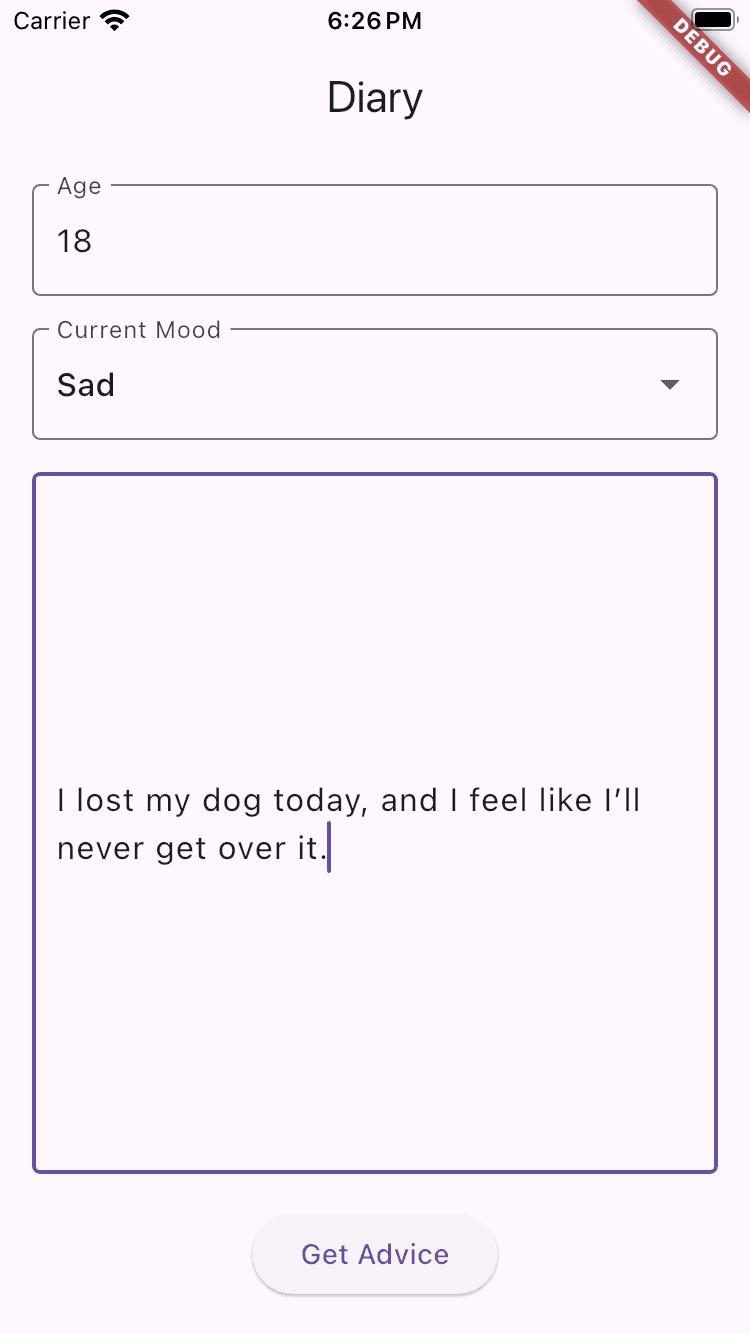
It works, and it streams in beautifully!

Conclusion

Prompt engineering is hard, but actually constraining your Ai can lead to higher quality outputs. Here separately handling extreme cases, identifying topics, and writing advice is just a start, but has shown how multi-step prompt chaining can guide your Ai to give your users a better Ai experience.

Stay in the loop

Get the occasional insights on what's going on with "the machines are taking over" straight to your inbox.

Follow us

Copyright easybeam © 2024. All Rights Reserved

Knowledge

Status

Documentation

Security

Cookies

Privacy Policy

Terms & Conditions

Stay in the loop

Get the occasional insights on what's going on with "the machines are taking over" straight to your inbox.

Follow us

Copyright easybeam © 2024. All Rights Reserved

Knowledge

Status

Documentation

Security

Cookies

Privacy Policy

Terms & Conditions

Stay in the loop

Get the occasional insights on what's going on with "the machines are taking over" straight to your inbox.

Follow us

Copyright easybeam © 2024. All Rights Reserved

Knowledge

Status

Documentation

Security

Cookies

Privacy Policy

Terms & Conditions

Stay in the loop

Get the occasional insights on what's going on with "the machines are taking over" straight to your inbox.

Follow us

Copyright easybeam © 2024. All Rights Reserved

Knowledge

Status

Documentation

Security

Cookies

Privacy Policy

Terms & Conditions